

Not every mark on a wall means the same thing, but a damp patch almost always does: it’s telling you moisture is getting in somewhere it shouldn’t. Left alone, that moisture doesn’t stay contained to one spot. Mould starts forming, air quality drops, the timber beneath begins to weaken, and nearby paintwork or plaster starts giving way.
What makes damp confusing is that it’s rarely just one problem. Two very different issues, rising damp and penetrating damp, can look almost the same once they show up on a wall, even though their causes lie at opposite ends of the building. Telling them apart usually takes a trained eye, which is why most homeowners end up calling in a damp proofing expert rather than guessing.
In this guide, we’ll walk you through exactly how to spot rising damp vs penetrating damp, how to fix each one the right way, their costs, prevention tips, and when it’s worth getting a professional opinion instead of a DIY attempt.
What is Rising Damp vs Penetrating Damp
Damp reaches a wall from one of two directions, and knowing which one tells you everything about the fix.
Rising damp
Rising damp travels upward, pulled through a wall or floor by capillary action, the same principle that lets a paper towel soak up water from below. Because gravity eventually overpowers that pull, it rarely climbs higher than a meter, and it only ever shows up on ground-floor walls. It’s most common in older properties that were built without a damp-proof course (DPC), or where an existing one has deteriorated or been bridged over time, letting moisture bypass the barrier entirely. A missing or failed DPC, raised ground levels that bridge the barrier, solid brick walls without a damp membrane, or blocked sub-floor ventilation are the usual culprits.
Penetrating damp
Penetrating damp works the opposite way; it moves horizontally, entering from an external source rather than rising from below. Rain, especially during heavier UK winters, a leaking pipe, or a structural defect are typical causes, and because it isn’t tied to ground level, it can turn up anywhere: ground floor, upper floors, even the roof space. Behind almost every case sits one specific fault in the building’s exterior, whether that’s cracked render or brickwork, damaged tiles or flashing, blocked guttering, worn pointing, a hidden pipe leak, or poorly sealed windows and doors. Trace that fault and seal it, and the problem generally stops for good.
Yahan poori tarah se dobara likha hai, order shuffle kiya, kuch extra bullets add kiye, aur exact phrases hata di:
How to Spot Rising Damp?
Ground moisture leaves a fairly distinct fingerprint on a wall, and once you know what to look for, it’s rarely mistaken for anything else. Because it depends on capillary action counteracting gravity, the damage remains low, almost never exceeding a meter, and it’s confined entirely to ground-floor walls.
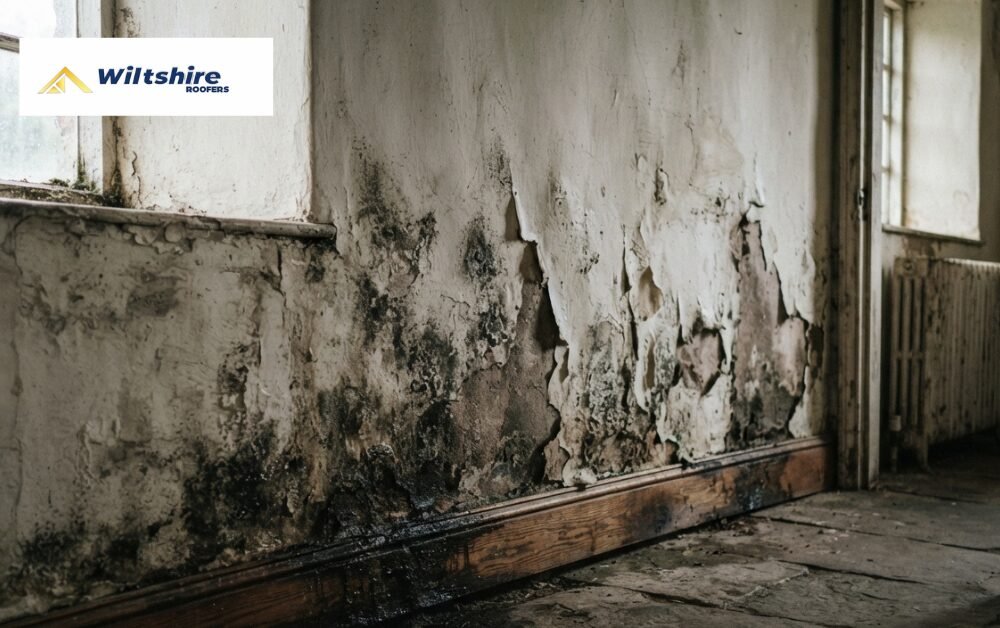
Watch for these warning signs:
- Staining that forms a horizontal band near the skirting, almost like a tide mark
- Wallpaper or paint lifting and peeling close to floor level
- Plaster that’s gone soft, spongy, or sounds hollow when you tap it
- A chalky white residue on the surface, caused by salts left behind as moisture evaporates
- A musty, earthy smell that’s noticeably stronger near the floor than elsewhere in the room
- Skirting boards that feel damp to the touch or have started to warp
One of these on its own doesn’t confirm much, but spotting two or three together is usually enough to know what you’re dealing with.
How to Fix Rising Damp
There’s a logical order to putting rising damp right, and skipping ahead (redecorating before the source is dealt with, for instance) usually means doing the work twice.
Sort Out the Damp-Proof Course First
Everything starts here. Where the damp-proof course (DPC) has failed or was never installed, chemical injection is the go-to method: a water-repellent fluid worked into the mortar to rebuild the barrier. Walls in worse condition sometimes need a physical membrane fitted instead. Getting this right depends heavily on the type of wall and how long the damp has gone untreated, so it’s not really a step worth guessing at.
Deal With Whatever’s Bridging It
A freshly repaired DPC can still fail if something gives moisture a way around it. Common culprits include external ground levels, pathways, or planted beds that sit higher than the barrier itself, as well as soil, render, or general debris piled against the base of the wall. Clearing or lowering these restores the barrier’s effectiveness.
Strip Back and Replaster
Old plaster holds onto salts that rising damp has deposited over time, and those salts pull in moisture from the air even long after the wall behind them has fully dried. That’s why patching over the surface never really works; the plaster needs to be removed and replaced with a salt-resistant render, then given proper time to dry before any decorating goes ahead.
Get Airflow Moving Again
Sub-floor ventilation gets overlooked more than it should. Where air bricks are blocked, cracked, or simply too few, moisture builds up beneath suspended floors with nowhere to escape. Clearing existing vents or adding new ones fixes this and helps stop the damp returning once everything else has been treated.
How to Spot Penetrating Damp
Unlike rising damp, penetrating damp doesn’t stick to one predictable zone; it shows up wherever water’s finding a way in, which can mean anywhere from a ground-floor wall to a bedroom ceiling.
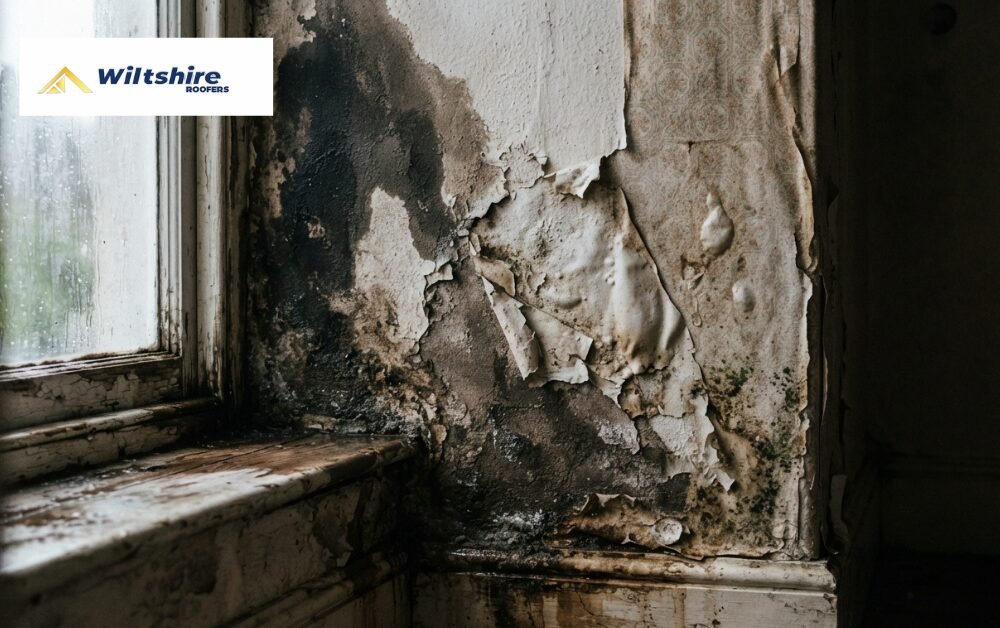
Signs to look out for:
- Damp patches appearing at any height, but especially around rooflines, chimney breasts, and window frames
- Patches with sharp, irregular edges rather than a smooth, even spread
- Staining that gets noticeably darker or larger straight after rainfall
- External damage nearby, cracked render, a missing tile, or an overflowing gutter that roughly matches up with the indoor patch
- Mould clustered tightly in one area instead of spread across the wall
- A patch that’s damp to the touch even when the rest of the wall feels dry
Because the cause is almost always a specific fault rather than a general condition, penetrating damp tends to point fairly directly to its source, if you know where to look.
How to Fix Penetrating Damp?
The fix here isn’t really about the wall itself; it’s about finding and closing off whatever’s letting water through from outside.
Track Down the Entry Point
Before anything else, the damp patch needs to be traced back to its source. That means working through the likely culprits systematically: the roof, exterior walls, window surrounds, and any pipework running close to the affected area, until the actual defect turns up.
Sort Out Roofing Problems
Roofs are a frequent starting point. Cracked, slipped, or missing tiles, along with failing flashing around chimneys and joints, are classic weak spots where rainwater can get in.
Clear Out the Guttering
When gutters are blocked or damaged, water has nowhere to go except over the edge and down the wall. Clearing built-up debris and repairing or swapping out damaged sections usually stops this fairly quickly.
Repoint Where Brickwork Has Worn Through
Mortar joints that have worn away, or render that’s cracked, give water a direct path into the wall. Repointing the affected areas and sealing any cracks rebuilds that layer of protection.
Reseal Around Windows and Doors
Perished seals around frames let water creep in gradually. Resealing them and checking that the sills angle away from the building rather than toward it closes off this entry point.
Add a Breathable Protective Coating
For extra defence, a breathable masonry sealant can be applied to the exterior. It keeps rain out while still letting any moisture already in the wall escape, rather than sealing it in.
What Damp Repair Typically Costs
Pricing shifts a fair bit depending on what’s actually wrong, how far it’s progressed, and how much of the wall or roof is involved. Chemical DPC injection is generally charged by the linear metre, so a longer stretch of wall naturally pushes the total higher. Replastering or re-rendering works on a similar principle; the cost depends on the area being treated. Roof repairs span a wide spectrum, from swapping out a handful of tiles to a complete overhaul of the flashing. Gutter repairs and clearing, by contrast, tend to be one of the cheaper jobs on the list, which makes it all the more surprising how often they get left until they’ve already caused penetrating damp elsewhere.
A few things typically move the price up or down:
- How far the damage has progressed: catching it early costs noticeably less than repairing damage that’s been left for months or years
- The size of the area involved: more surface area means more materials and more labor hours
- How easy the area is to reach: roof work in particular often costs more once scaffolding or specialist access equipment is needed
- Whether the wall is standard brick or older solid/stone construction, period properties sometimes need specialist materials that cost more than a standard DPC job
Long-Term Damp Prevention Tips
Most damp problems are far cheaper to prevent than to fix, and prevention mostly comes down to a handful of maintenance habits kept up consistently rather than any one big job:
- Clear gutters and downpipes at least twice a year, more frequently if the property sits near overhanging trees
- Check the roof periodically for tiles that have slipped, cracked, or gone missing before they let water through
- Keep external ground levels, paths, and flower beds below the damp-proof course rather than level with or above it
- Maintain steady airflow both indoors and beneath suspended floors, since stagnant air holds moisture rather than letting it escape
- Repair small cracks in render or pointing as soon as they show up, before they widen and let water in
- Book a professional damp inspection every few years, especially for older properties or ones with a history of damp
When kept consistent, these habits catch most problems while they’re still minor and cheap to deal with, long before they turn into a full DPC repair or replastering job.
Knowing When It’s Time to Call In a Professional
Not every damp issue requires an expert; many early-stage problems respond well to basic maintenance. But a few situations genuinely call for a professional assessment rather than another DIY attempt:
- You’ve already tried the obvious fixes. Cleared the gutters, resealed a window, patched the area, and the damp’s still there? That usually means the actual cause hasn’t been touched yet.
- The damage covers a lot of ground. Widespread staining, plaster damage across more than one wall, or damp that’s spread beyond its original spot needs more than a quick patch.
- There’s a structural angle to it. Sagging floors, timber that’s started rotting, or crumbling brickwork aren’t something to guess at; they need a proper look.
- The property’s had damp before. Older homes, especially, tend to have multiple causes layered together, which is hard to separate without experience.
Trying to fix the surface without addressing the root cause often backfires; the problem usually comes back worse, and in some cases it can even affect your home insurance if things escalate.
If you’d rather have someone experienced take a look, our Trusted Roofers in Trowbridge, Wiltshire have been carrying out damp proofing services in Trowbridge and the surrounding areas for years.
Conclusion
Rising damp and penetrating damp might look almost identical on a wall, but everything about how you fix them is different. One comes up from the ground and needs a proper damp-proof barrier restored. The other comes in from outside and needs its entry point tracked down and sealed. Treating one like the other usually means paying for work that never actually solves the problem.
If you’re staring at a damp patch and aren’t sure which one you’re dealing with, that’s exactly the kind of thing worth getting checked rather than guessed at.
Contact us for straightforward advice and a free, no-obligation quote.
FAQs
Does rising damp ever go higher than a metre?
In modern cavity walls, rarely; capillary action loses out to gravity beyond that point. In solid stone or older brick walls, it can occasionally climb a little further, which is one reason period properties need a slightly different diagnostic approach.
Will my insurance cover penetrating damp?
Sometimes, if it’s linked to a sudden, identifiable event like storm damage. Damage that built up gradually, such as gutters left blocked for years, is often excluded. Check your specific policy rather than assuming either way.
How long before a treated wall is fully dry?
Usually several weeks to a few months after treatment, depending on wall thickness and material. Solid stone walls tend to take longer than standard brick.
Is it ever fine to just paint over a damp patch?
No. Painting over damp without treating the cause traps moisture behind the new coat and almost always makes the underlying damage worse, even if it looks fixed for a few weeks.
